



Cold-Heading Defects on a Shoulder Screw: What Each One Looks Like and What Causes It

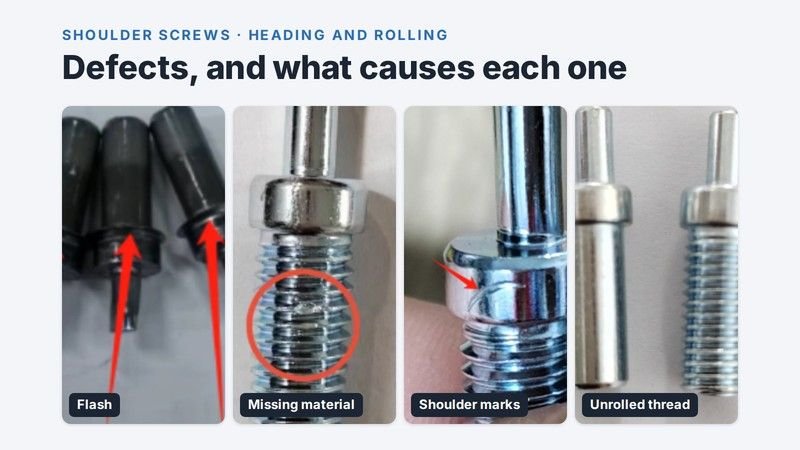
Short answer: Most visible defects on a cold-headed shoulder screw trace back to one worn or mis-set tool at one station. A short die leaves a dent in the pin, a worn gripper leaves flaking or marks, a blank cut too short leaves the shoulder under-filled, and a broken punch spring leaves flash. Thread defects come from rolling, or from a change at heading that was not passed on to rolling. If appearance matters on your part, name the defects and the zones you will reject, and agree a reference sample; “no visible defects” on its own is read differently by every inspector.
The part and how it is made
The photos and causes below come from our own inspection standard and defect analysis for an M8 eccentric shoulder screw used in door and window hinges. It is headed from wire on a multi-station cold former, which forms the pin, the shoulder and the hex socket. The thread is then rolled, and the part is plated.
Defects from heading
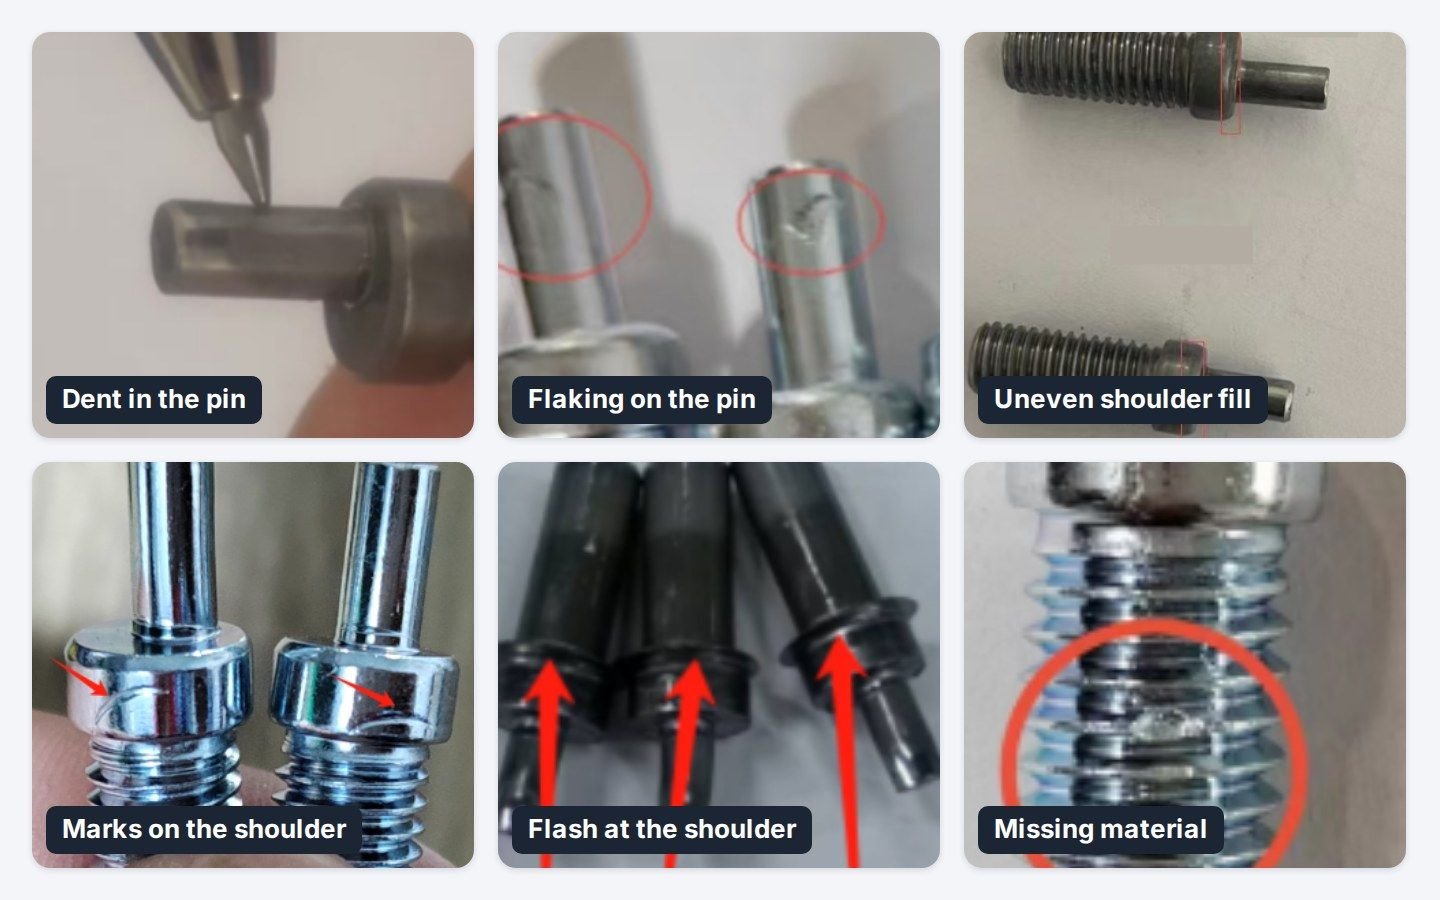
- Dent in the pin. A shallow dent part-way along the small pin. Cause: the die at the first station was too short. Control: during the run, the pin is measured all the way round, at the top, middle and bottom.
- Flaking on the pin. Thin skin lifting from the pin surface, which still shows as marks after plating. Cause: a worn or misaligned gripper at the first station. Control: the gripper is replaced at a fixed output count, before it wears enough to mark parts.
- Uneven shoulder fill. The shoulder is full and sharp on one lot, rounded on another. Cause: the blank was cut too short, so there was not enough metal to fill the shoulder. Control: fill is judged against the first approved sample.
- Marks or dents on the shoulder. Cause: a misaligned gripper at the third station. Control: replaced at a fixed output count.
- Flash at the shoulder edge. A thin ring of metal squeezed out around the shoulder. Cause: a broken spring on the sixth-station punch. Control: the springs are replaced at a fixed output count.
- Missing material in the thread. A pit or gap in the thread flanks. Cause: a defect in the wire itself. Control: tighter incoming inspection of the wire.
Each of these points to one tool at one station, which is why the pattern is more useful than the list. On this part, any tool change, whether a die, a punch or an ejector pin, is followed by a dimensional check from quality control before the run continues.
The defect optical sorting can miss
If a corner breaks off the punch that forms the hex socket, the parts made after it come out with one socket corner missing. Our CCD optical sorting cannot reliably see inside a small socket, so the punch is checked each time it is changed, and the 90° socket angle is checked on a fixture. If a damaged punch is found, the parts made with it are kept apart from the rest of the lot.
Defects from thread rolling
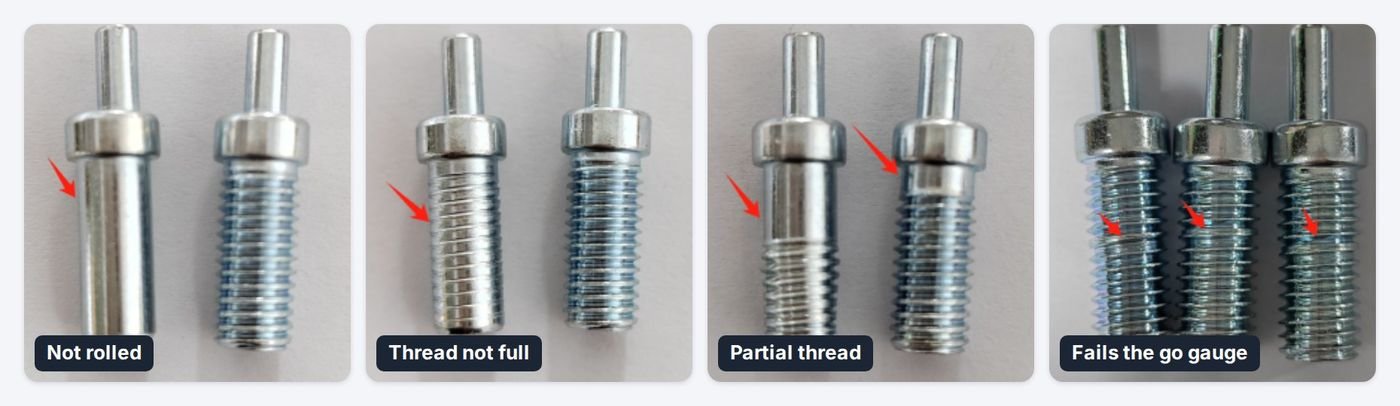
- Not rolled. A plain shank where the thread should be: the part skipped rolling.
- Thread not full. Crests flat or low. Rolling forms the thread by displacing metal, so the shank diameter from heading decides how full the thread will be. On this part, a die change at heading that shifts the shank diameter has to be passed on to rolling.
- Partial thread. The thread is too short, or starts too far below the shoulder.
- Fails the go gauge. A thread that looks complete but will not take the go gauge, so it will not take a nut or a tapped hole either.
What to write in your appearance requirement
- Name the zones and the defects. Say which surfaces matter (pin, shoulder, socket, thread) and which defects are rejects there: flaking, flash, marks on a visible face, missing socket corners.
- Agree a reference sample. Shoulder fill and surface marks are easier to judge against a signed sample from the approved first lot than against words. On this screw, the first approved sample is the reference for shoulder fill.
- Say whether the socket counts. If the socket takes a tool or a mating part, ask how socket corners and the socket angle are checked, since optical sorting may not see inside it.
- Gauge threads after plating. Plating adds thickness in the thread, so the go gauge check that matches assembly is the one done after plating.
If you have defect photos from a delivery, ours or another supplier’s, send them with the drawing through our RFQ form. We will tell you which stage they most likely come from and what we would check.
Related: eccentric shoulder screws: holding the 90° socket angle · black zinc or black oxide on hinge screws
How this was written: the defects, causes and controls come from our own inspection standard and defect analysis for this screw (2024–2025). Photos are from our quality team.